

PATTERN DESCRIPTION: The Cartman is an easy to tie, realistic foam pattern that imitates stoneflies, crickets, and grasshoppers. I’ve been working on foam cylinder patterns for years, but was never really happy with the results until I started tapering the ends of the cylinders, which creates a more realistic, buggy shape. Foam cylinders come in many sizes and colors and make quick, durable, simple fly bodies in sz.6-14. I had great results this spring with a sz.12 all black pattern used during the Skwala hatch and had great results the last couple of years fishing a sz.6 during the Salmonfly hatch on the Yellowstone River and Big Hole River here in Montana. Olive, tan and yellow work well tied with various styles of hopper legs to imitate grasshoppers.
MATERIAL NEEDED:
HOOK: Dai-Riki #710 3xl hook
THEAD/BODY: Iridescent Veevus Thread
BODY: Foam Cylinder 3/16″
WING: Poly Wing – 1 strand
LEGS: Superflex Legs

Step 1: Wrap a 2 layer thread base with the appropriate colored thread, dubbing or Iridescent Thread. End just 2 wraps behind eye of hook.

Step 2: Apply a thin layer of Zap a Gap to thread base.

Step 3: Position foam cylinder onto hook as shown above. Take care to center the foam body on top of hook. Once positioned, press the foam onto the hook and hold for 2-3 seconds, or until the Zap a Gap dries.

Step 4: Bind down the foam cylinder body with 2-3 wraps of thread just behind the eye of the hook. Next, advance the thread back to 1/4 point of hook, and again, bind down the foam body with 2-3 firm wraps of thread as shown above.

Step 5: Trim foam stonefly body to desired length. I trimmed the pattern above about a hook gap beyond point of hook.

Step 6: Trimmed salmon fly body.

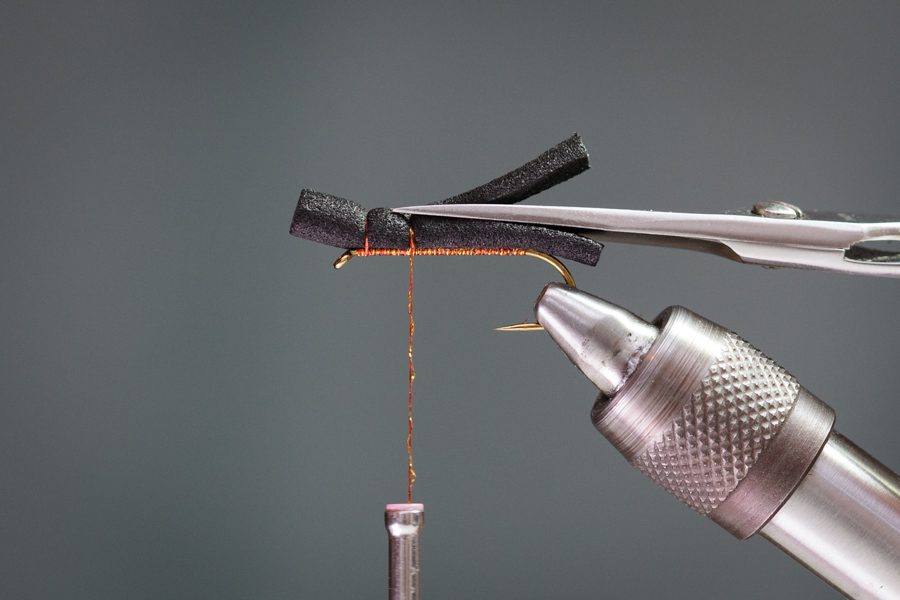
Step 7: Trim the foam cylinder body as shown above. Trim the foam cylinder at a slight angle. Start the cut at the middle point of the foam cylinder, and end it at the hanging thread.
 Step 8: Trim the foam wedge with one cut of the scissors. The purpose of cutting out the foam wedge helps the poly wing lay flat along the body, creating a realistic stonefly wing profile. Plus it creates a tapered foam body much like the real insect.

Step 9: Trimmed foam body.

Step 10: Picture of foam wedge. Save the foam wedge for Step 19.

Step 11: Advance thread towards hook eye. Bind down 1 strand of poly wing with 2-3 wraps of thread.

Step 12: Advance thread back and again, bind down poly wing with 1-2 wraps of thread.

Step 13: Pull back remain strand of poly wing and bind down the 2-3 firm wraps of thread.

Step 14: Trim poly wing to length, just beyond end of foam body.

Step 15: Trimmed poly wing.

Step 16: Attach superflex legs to both sides of salmon fly with 3-4 thread wraps. I typically add a drop of glue to all the legs after the fly is complete to lock them into place rather than bind them down with a bunch of bulky thread wraps.

Step 17: Top view of secured legs.

Step 18: Apply a thin layer of Zap a Gap to wing and thread as shown above. Apply glue to rear thread wraps only.

Step 19: Bind down foam wedge with the thin end facing towards the back of the fly with 3-4 thread wraps.

Step 20: Advance thread forward, underneath the foam wedge.

Step 21: Apply another thin layer of Zap a Gap to thread wraps and onto head of fly.

Step 22: Press on foam wedge for 2-3 seconds or until glue dries.

Step 23: The foam wedge adds some bulk to the front portion of the fly and help fold the poly wing down and back creating a realistic stonefly sillouette.

Step 24: Secure another pair of super flex legs to both side of the fly with 3-4 thread wraps.

Step 25: Whip finish fly at hook eye.

Step 26: Taper the head of the fly as shown.

Step 27: Add glue to leg wraps and thread wraps to secure the fly.

I added a tiny strip of orange foam to this one to give it an even buggier look.

Top view of the foam cylinder fly.

Tie up your own variations of this pattern and let me know how they work for you! And be sure to check out our store if you are looking for materials to tie any of the patterns we have here on the Hopper Fishing Blog.
Many thanks for this pattern! Can’t wait to give it a try. I suspect the fish will find it inviting.
P.S. Now tying your Morrish Hopper and Thunder Thighs Hopper. Can’t wait to give them a try later in the summer when up in Montana. Great kits!
Thank your sir.
Very nice and simple pattern. A killer too… congrat!
Regards Timothy
Sent from Samsung Mobile
This is a great tutorial and great overall blog! Thanks for the great pictures and in depth instructions.
What size are th foam cylinders?
The foam cylinders are 3/16″ which we have listed as a size medium on our store. Thanks
Love this detailed step by step guide and the result is pretty impressive. Gonna try this one soon, what difficulty would you rate it?
Cheers
Sara
One of the easier foam flies to tie. Just make sure to add some superglue to keep the body in place.
Thanks a lot for your reply Eric!