

PATTEN DESCRIPTION:
I first posted how to tie the Morrish Hopper in 2010 and have had great fishing results and fun tying different version of the realistic hopper pattern over the years. I had great success with different colored bodies like cream, flesh, green, yellow, and especially purple. I added a white poly wing to the hopper for the ultimate hopper/dropper fly and rough water fly. I also tied the hopper with various leg materials and styles, including thunder thigh legs, and madame-x style legs. Even though the original tutorial produced a great looking fly, I was never able to tie quick, perfect-looking hoppers every time.
Listed below is a quick and easy solution, and a new tutorial for tying perfect and effective, Morrish Style Hoppers. The Morrish Hopper Kit that we recently added to our online store includes realistic, pre-cut foam bodies, 1mm thick post material and the best rubber leg material for making rubber-knotted hopper legs. Available in three sizes and nine different color combination. I prefer 2xl long curved shank hopper or nymph hooks for tying the Morrish Hopper because of the better hook gap and the fact that the bend of the shank helps to secure the foam body when superglue is applied. Also, I use light 8/0 or 10/0 thread when tying the Morrish to minimize thread build up. The new Veevus 8/0 is a great all around thread because of its superior 3/0-like strength. Pre-cut bodies and Zebra Leg material can also be purchased separately. Tie some up, hopper season is right around the corner.

MORRISH HOPPER KIT:
Bodies: Pre-cut, realistic hopper bodies. 5mm thick two-tone colors. Available in 3 sizes, and 9 different color combinations. 12 ea.
Post: 1mm thick, high-vis orange pre-cut shapes. 1mm thick foam post helps the fly land upright compared to 2mm. 12 ea.
Legs: Zebra Hopper Legs, Natural/Medium, 8″ strand. The ultimate rubber leg material for knotted hopper legs. Ties in perfect every time, unlike single-strand leg material.
Now available with or without Dai Riki Fly tying hooks.
Update: Check out our Hopper Hack video for a quick trick for trimming Morrish bodies.

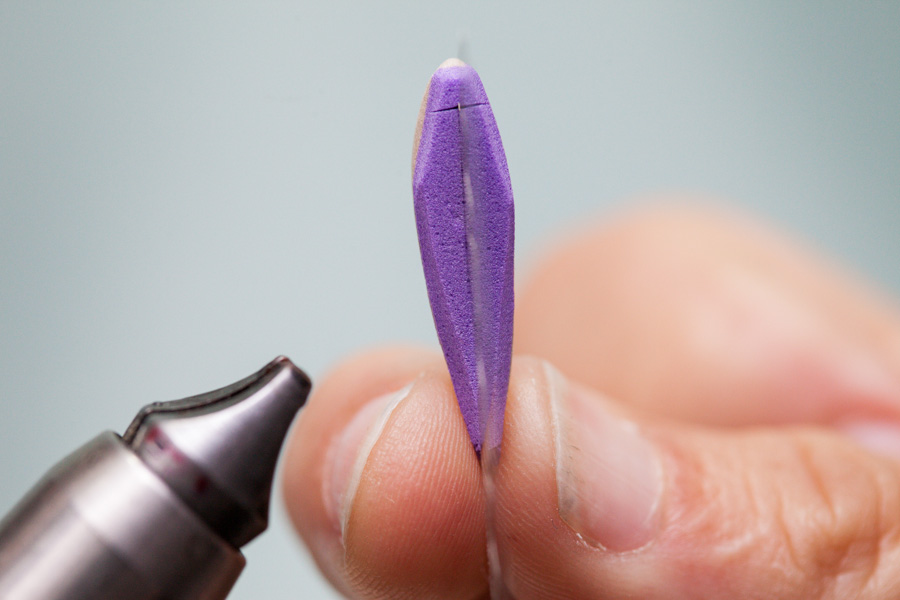
Step 1: Holding the foam piece by the pointed end, carefully trim the edge of the foam with one scissor cut.

Step 2: Notice the thin strip of foam being trimmed off. All you are doing is rounding the edges of the foam. Cut the thinnest strips possible.

Image: Trimmed edge.
Step 4: Trim the rear tapered end of body with one scissor cut.

Image: Trimmed front and rear edges of foam body.

Step 5: Next, trim the opposite edges of the foam body as shown above.

Step 6: Trim the other side of the body as shown above.

Step 7: Trim out the wing of the hopper with one scissor cut half-way through the purple foam. *The tan foam is the top of the hopper, and the purple foam is the belly of the hopper.

Image: Notice cut is angled and cut half way through the purple foam.

Step 8: Next, trim off the remaining chunk of foam.

Image: Completed rear portion of hopper body. The tan foam is the wing of the hopper and the purple foam is the belly of the hopper.

Step 9: Trim the head of the hopper as shown.

Image: Trimmed head of hopper.

Step 10: Carefully cut 3/4 of the way through the purple foam, or belly, with a razor blade, 2 eye-lengths back from the head of the hopper.

Image: The cut should look like this.

Step 11: Next, slice 3/4 of the way through the purple foam, down the middle of the body, length-wise. Notice that the cut ends at the cut made in the prior step. Length of cut should extend to 3/4 mark, of foam body.

Image: Second cut should look like image above.

Step 12: Place hook in vise and make a thread base from eye of hook to hook point. 2xl curved nymph hooks or hopper-style hook are recommended.

Step 13: Whip finish behind hook eye.


Step 14: Place foam Morrish body on hook and make sure hook fits within the razor cuts as shown above.

Image: Proper placement of the foam body on the hook. Notice the eye of the hook extends just beyond the head of the hopper and the foam body just covers the length of the hook. Take care not to push the foam body too far down on the hook shank, covering up the hook gap.

Step 15: Carefully apply superglue to hook only using a brush, bodkin or toothpick. Apply just enough superglue to saturate the thread wraps on the hook only.

Step 16: Notice superglue is being applied to hook. The superglue will saturate the thread on the hook and form a secure, permanent bond with the foam.

Step 17: After applying the superglue, squeeze and hold the foam body together for 10 seconds to set the glue.

Image: Proper placement of foam body on hook. Notice the eye of the hook extends just beyond the head of the foam body and the body does not interfere with the hook gap.

Image: Glued on body

Step 18: Start thread on hopper body with 2-3 loose wraps of thread close to the middle of the hook on large and medium hoppers, and right at the hook point on small hoppers. *Take care not to apply much thread pressure while tying the Morrish Hopper. The bulk of the fly is secured with superglue, not thread wraps.

Image: Foam post

Step 19: Trim the foam post to shape by cutting the blunt end to a point as shown.

Image: Trimmed foam post

Step 20: Secure foam post to top of body with 1 wrap of thread.

Image: Zebra hopper legs – 2 strands

Step 21: Tie an overhand knot in a double strand of Zebra Leg Material. Take care to not separate the front portion or two strands of the leg material. The legs will tie in perfectly every time if the two strands are not separated.

Step 22: Secure legs with one wrap of thread.

Step 23: Knot and tie in the near side leg with 2 wraps of thread. Notice the knots in the legs are even and extend to the end of the hopper.

Step 24: Secure both legs with a very small amount of superglue. The glue helps lock the legs to the sides of the foam hopper body. Superglue and rubber do not mix, so apply as little glue as possible.

Image: Secured legs. Notice the superglue covers only the thread wraps.

Image: Top view of leg placement

Step 25: Trim the tags of the hind legs.

Step 26: Advance thread forward, over the top of the foam body, as shown above.

Step 27: Form body segment with 2-3 wraps of thread.

Step 28: Form an overhand knot in a single strand of Zebra leg material for the front legs.

Step 29: Bind down the orange post and secure legs on both sides of the hopper with 3 loose wraps of thread. You can adjust each leg by twisting the front of each leg to the correct angle and length.

Step 30: Secure the legs into the proper position with a drop of superglue, not thread wraps. If you try to secure the legs with additional wraps of thread, the legs will twist out of position every time.

Step 31: Whip fishing fly with 3 turns. *You can also advance the thread at the belly of the fly, towards the hook eye and whip-finish behind the eye of the hook.

Step 32: Secure whip finish with a small drop of superglue. You can also add a small amount of glue to each knot in the rubber legs.

Step 33: Trim legs even.


Add eyes with Sharpie

Image: Top view of finished Morrish
COMPLETED PURPLE MORRISH HOPPER.
What are you using to cut the “precut realistic hopper bodies”?
We have custom dies for the new bodies in small, medium and large sizes.
I was hoping you wouldn’t say that….but the bodies do look great.
Great description and pictures, good work! Howdy Fredrik
Nice Hook!